
Is your WordPress website struggling with slow loading times? If you’ve ever tested your site on Google PageSpeed Insights, GTmetrix, or Pingdom, you’ve likely seen the dreaded warning: “Leverage Browser Caching” or “Serve static assets with an efficient cache policy.”
Site speed is no longer just a luxury—it’s a critical factor for user experience and SEO. Visitors expect your site to load in the blink of an eye, and search engines like Google actively reward faster sites with higher rankings.
One of the most effective ways to dramatically speed up your WordPress site is by leveraging browser caching through your .htaccess file.
In this post, we’ll explain what browser caching is, why it matters, and how you can implement it effortlessly using a lightweight plugin.
What is Browser Caching and Why Does it Matter?
Every time a user visits your website, their browser has to download all the static files that make up the page. This includes your logo, images, CSS stylesheets, JavaScript files, and web fonts.
Without caching, the browser has to re-download these exact same files on every single page view or repeat visit. This wastes bandwidth, increases server load, and severely slows down your website.
Browser caching solves this problem. It tells the visitor’s browser to store these static files locally on their device for a specific period. When they navigate to another page or return to your site later, the browser loads the files directly from its local cache instead of fetching them from your server again.
The result?
- Lightning-fast page loads
- Significantly reduced server load and bandwidth usage
- A much better, frictionless user experience
- Higher SEO rankings due to improved performance metrics
How to Leverage Browser Caching Using .htaccess
For websites running on an Apache server, browser caching is controlled via the .htaccess file located in the root directory of your WordPress installation.
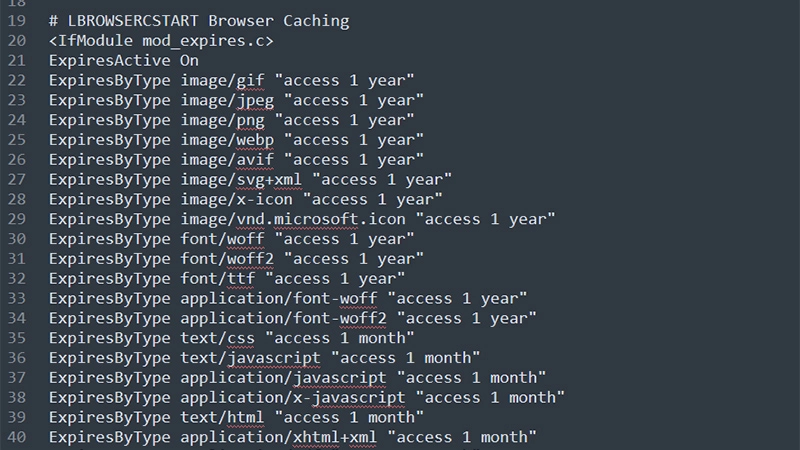
By adding specific mod_expires directives to this file, you can set the expiration dates for different types of files. For example, you can tell the browser to keep images for a year, while keeping CSS and JavaScript files for a month.
While you can edit your .htaccess file manually, it can be risky. A single typo or misplaced character in this critical file can break your entire website, resulting in a 500 Internal Server Error.
Fortunately, there is a much easier and safer way.
The Easier Way: Leverage Browser Caching Plugin
Instead of messing around with server files manually, you can use the Leverage Browser Caching WordPress plugin. It’s a lightweight, reliable, and completely hassle-free solution to fix caching warnings and speed up your site.
Key Features and Functionality
The Leverage Browser Caching plugin is designed with simplicity and performance in mind. Here’s what makes it the perfect tool for your site:
- Zero Configuration Needed: There are no confusing settings pages or toggles to mess with. Simply install and activate the plugin, and it starts working immediately.
- Automatic .htaccess Modification: Upon activation, the plugin safely and automatically writes the optimal caching rules directly into your
.htaccessfile. - Comprehensive Asset Coverage: It sets efficient cache expiry headers for all major static file types, including:
- Images (JPEG, PNG, GIF, WebP, AVIF, SVG, ICO) – Cached for 1 Year
- Web Fonts (WOFF, WOFF2, TTF) – Cached for 1 Year
- Stylesheets (CSS) and Scripts (JS) – Cached for 1 Month
- Documents (HTML, PDF, JSON) – Cached for 1 Month
- Clean Deactivation: If you ever decide to deactivate the plugin, it cleanly removes its rules from your
.htaccessfile without leaving any leftover code behind. - Boosts PageSpeed Scores: This plugin directly addresses and fixes the browser caching warnings shown by Google PageSpeed Insights, GTmetrix, WebPageTest, and YSlow.
How to Get Started
Getting started takes less than a minute:
- Log in to your WordPress Dashboard.
- Navigate to Plugins > Add New.
- Search for “Leverage Browser Caching”.
- Click Install Now, then Activate.
That’s it! Your website is now optimized with efficient browser caching policies.
Ready for Even More Speed?
If you love the results from the free plugin and want to push your website’s performance to the absolute limit, check out Leverage Browser Caching Pro.
The Pro version offers an advanced suite of 26+ optimization features, including customizable cache durations, GZIP compression, code minification (CSS, JS, HTML), delayed JavaScript execution, lazy loading for images and iframes, and dedicated WooCommerce optimization.
Upgrade to Leverage Browser Caching Pro today and make your site lightning fast!
By taking a few minutes to implement browser caching today, you are investing in a better experience for your visitors and setting your site up for long-term SEO success.